Case Creation
OVERVIEW
This document will provide step-by-step instructions on how to create a case by entering three elements: case-study source details, a georeferenced geometry of the case-study location, and summary case details. Use the links below to jump to specific instructions:
Entering Case Source Information
CASE EDIT PAGE
Once you have created a case you will be taken to the Case Edit page. This page allows you to add and edit information for In-Progress Cases.
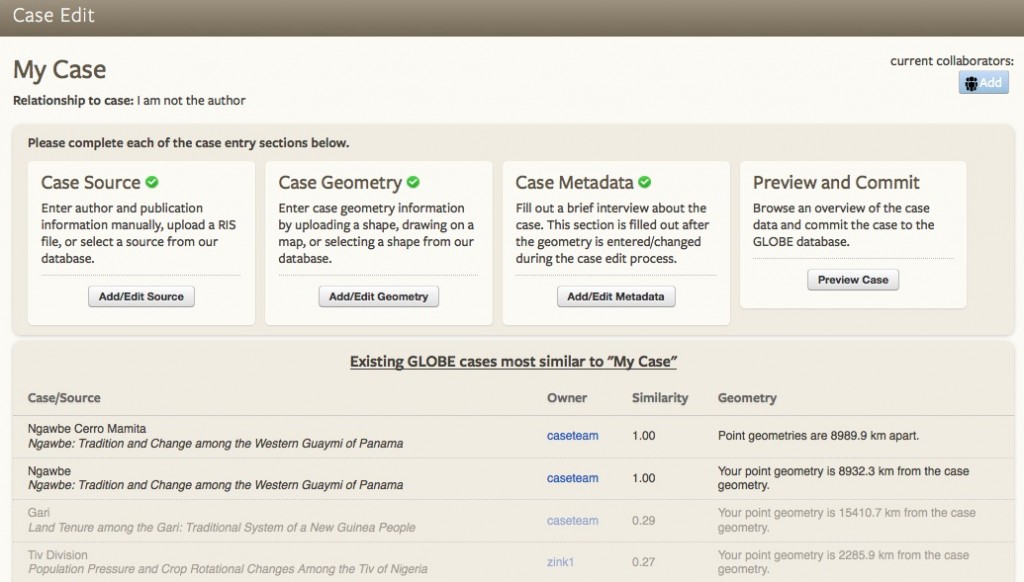
From the Case Edit page you can:
1. Case Source - allows you to edit the case’s source information.
2. Case Geometry - allows you to edit the case’s geometry.
3. Case Metadata - allows you to edit the case’s metadata.
4. Preview and Commit - allows you to preview your case and then commit your case to the GLOBE database.
5. Add Collaborators – in the upper right corner select “Add” to add collaborators to your case. The collaborator can only add case information, they can not delete or commit your case.
6. View Similar Existing GLOBE Cases - located below the case entry sections is a list of existing cases that are similar to your case.
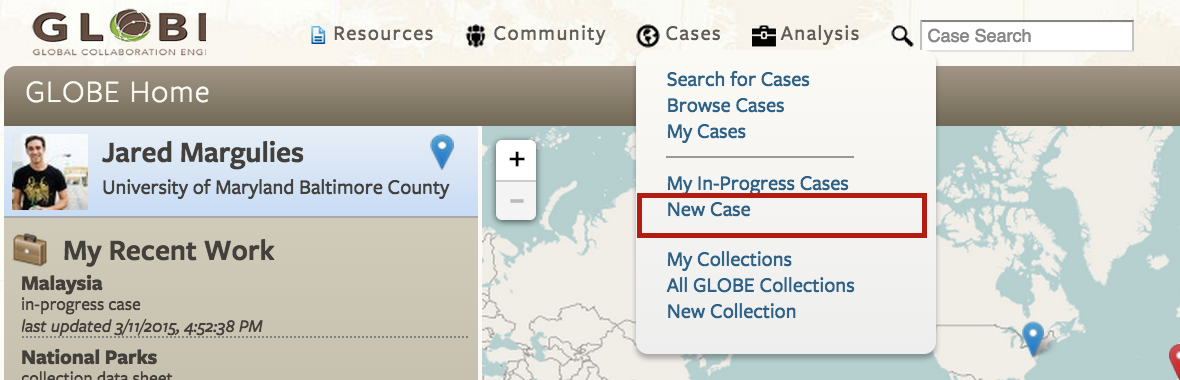
CREATE A NEW CASE
1. From the dropdown “Cases” tab from the GLOBE dashboard, select “New Case”
2. Enter a case name that describes the case-study location (e.g. “Liaocheng” for Liaocheng, Shandong Province, P.R. China; “Gunpowder River Watershed” for a watershed near Baltimore, Maryland, USA). For more help, see “How do I name a case?”.
3. Use the drop-down menu to specify your relationship to the case. If you an author, select “I am an author.” Otherwise, select “I am not an author.”
4. Select “Create a new Case.”
ENTERING CASE SOURCE INFORMATION
1. Select “Add/Edit Source” from “Case Source” box to enter bibliographic and contact information.

2. Use the drop-down menu to select your case source entry method (see below).

2.1. Import from DOI: Input a valid DOI number.
- The system will automatically fill in the necessary information.
2.2. Manual Entry: Type in information directly into each field.
- The abstract can be copied and pasted from the case source into the “Abstract” box.
2.3. RIS Upload: Upload the bibliographic information saved in a .ris file that you have downloaded from the article web page (example), or exported from citation manager software (e.g. EndNote, Zotero, Mendeley, etc.).
- Browse to the .ris file on your computer and select “Upload” when finished.
- Note: author email and author web link are not included in .ris files. Be sure to add these manually into the “Contact Author Email” and “Contact Author URL” fields after uploading your .ris file.
2.4. Selection From GLOBE Database: Enter a search term (e.g. location of the case-study site, last name of first author of case-study, publication year, etc.) into the search box. Click on the blue “Add” link to the right of the GLOBE case listing.
3. Enter published keywords from case source (see below).

4. Select “Save” to save your case source information.
ENTERING CASE GEOMETRY
1. Use the drop-down menu to select your method for entering case geometry.

1.1. Upload a file: If you choose to upload a file, choose between a KML/KMZ or SHP file from the pull-down menu.

- KML/KMZ: A file format to display geographic data in an Earth browser such as Google Earth and Google Maps. Google offers a KML Tutorial and KMZ Tutorial.
- Shapefile: A shapefile is a geospatial vector data format used in geographic information systems software. A total of three files are need to create a complete geometry( .shp, .shx, .dbf). Wikipedia provides a description of Shapefiles.
1.2. Select existing geography: GLOBE currently offers three existing data layers from which to select case-study site geometries: Global Land Units, World Protected Areas, and Global Administrative Areas.

- Global Land Units (GLUs): GLOBE native unit of observation consisting of equal-area hexagonal cells of approximately 100 km².
- World Protected Areas: A global data layer of boundaries of protected areas.
- Global Administrative Areas: A global data layer of administrative boundaries at various levels of detail.
Tip - To zoom-in to a particular location, use either the zoom slider at the left of the map or the search box at the top of the map by entering a location name. Below is an example searching for the location of Rondonia, Brazil in the Amazon River Basin.

1.2.1. Select a geometry that appears close to your target location. The map will automatically zoom-in to display geometries in close proximity to where you clicked. Use the drop-down menu to display up to the 12 closest features (see below):

1.2.2. Under “Actions”, click “Show on Map” to highlight each geometry on the map.

1.2.3. Once you have located your target geometry, select “Add” under “Actions” to use the geometry in your case.
1.3. Draw on map: Manually draw a geometry representing the case-study site.
1.3.1. Use either the slider to the left of the map or the search box at the top of the map to zoom-in on a particular location.
1.3.2. Use the drawing tools at the top right corner of the map to create your geometry.

ENTERING CASE METADATA
1. Under “Case Metadata”, select “Add/Edit Metadata” to enter case details. If you close the step-by-step wizard, select “Case Metadata” from the navigation in the top right-hand corner.

2. Enter the name of the site expert (i.e., case-study author) into the “Site Expert” field.
3. Enter a valid email address for the site expert in the “Expert Email” field.
4. If available, enter a website URL for the site expert (i.e., personal, lab or departmental website).
5. Enter the study start and end year.
6. Enter keywords or tags different from and in addition to the published keywords entered in the case source information.
7. Use the “Contributor’s Note” field to add personalized notes (e.g., purpose of including case, geo-referencing procedure, etc.).

8. Select “Save and Continue” to proceed to next step.
9. Use the drop-down menu to select the geographic entity that best describes your case-study site. The Geographic Entity refers to the most accurate geographic representation of your case, for example “watershed”, “town”, or “protected area”. For more information on geographic entity definitions used in GLOBE, see our page on Globe Geographic Entities.

10. Selected the option that best describes how clear the description is of the geography and its representation as a geometry of the case study site. See documentation for Clarity Score details.
11. Select “Save and Continue” to proceed to the next step. If you’d like to return to a previous step, select “Go to Previous Step.”
12. Enter the case-study site area (km2) in the “Site Areas” field, as reported in the case source. The site area of a case dictates the assigned spatial scale of studies listed in Case Details. For more information, see our page on GLOBE spatial scales.

NOTE: The “Geom Type” field shows the automated classification of the case geometry, and “Geometry Area” provide the area of the case geometry that was uploaded, selected, and drawn in the previous section. For more information on geometry types, see our page on GLOBE Geometry Types.
PREVIEW & COMMIT A CASE
1. Under “Preview and Commit”, select “Preview Case.” If you close the step-by-step wizard, select “Preview” from the navigation in the top right-hand corner.

2. Review the data fields under the “Case Data” and “Source Data” tabs, as well as the geometry presented in the map on the right. To make revisions, select the edit function in the yellow banners along the top of the information boxes.

3. Review the “Cases Scores”. These scores were automatically generated based on your relationship to the case-study, accuracy of case geometry, and case details. If revisions are made, the case scores will be recalculated. For more information of case scores, select the “Learn more about Case Scores” link and/or see the Case Scores documentation page.

4. If you would like to make revisions to the case source, geometry, or details, use the navigation bar at the top right of the page. Revisions can be made as many times as you would like.
5. Once satisfied with the case, select “Commit Case” to save. Congratulations, your case is complete!
6. To share your case on the web, find your case under “My Cases” on the home dashboard and click “Edit”. Choose “Public” as the visibility option.